
 Sales:
  Customer Service:
 How to Measure Your Kitchen: The Step-by-Step Guide
Table of Contents
A kitchen renovation is one of the most significant financial investments you will make in your home. Prioritizing precision during the kitchen planning phase is crucial for achieving a high-end, custom aesthetic without the custom price tag.
However, a word of caution:
⚠️Do not fall for the "Free Design" tools found on many websites. While they seem convenient, these services are often lead-generation tactics designed to get you to pay a substantial price for your kitchen design.
The reality is that learning how to measure kitchen cabinets yourself is not difficult. You do not need complex software to get professional results. In less than 30 minutes, this guide will make you a pro, empowering you to design your own kitchen layout, select your cabinets with confidence, edit your plan as you please, and save thousands in the process.
Measure Your Kitchen: Step-by-Step Guide
You don't need to be an artist! Just grab a piece of grid paper and a pencil and follow these steps. Refer to the icons below.

Step 1: Draw Your Floor Plan
Start by drawing the rough shape of your room. Don't worry about scale yet; draw the lines of your walls.
Step 2: Measure Wall-to-Wall
Start at one corner of the room and pull your tape measure to the next corner. Write this number clearly on the outside of your drawing lines. Do this for every wall where you plan to install cabinets.
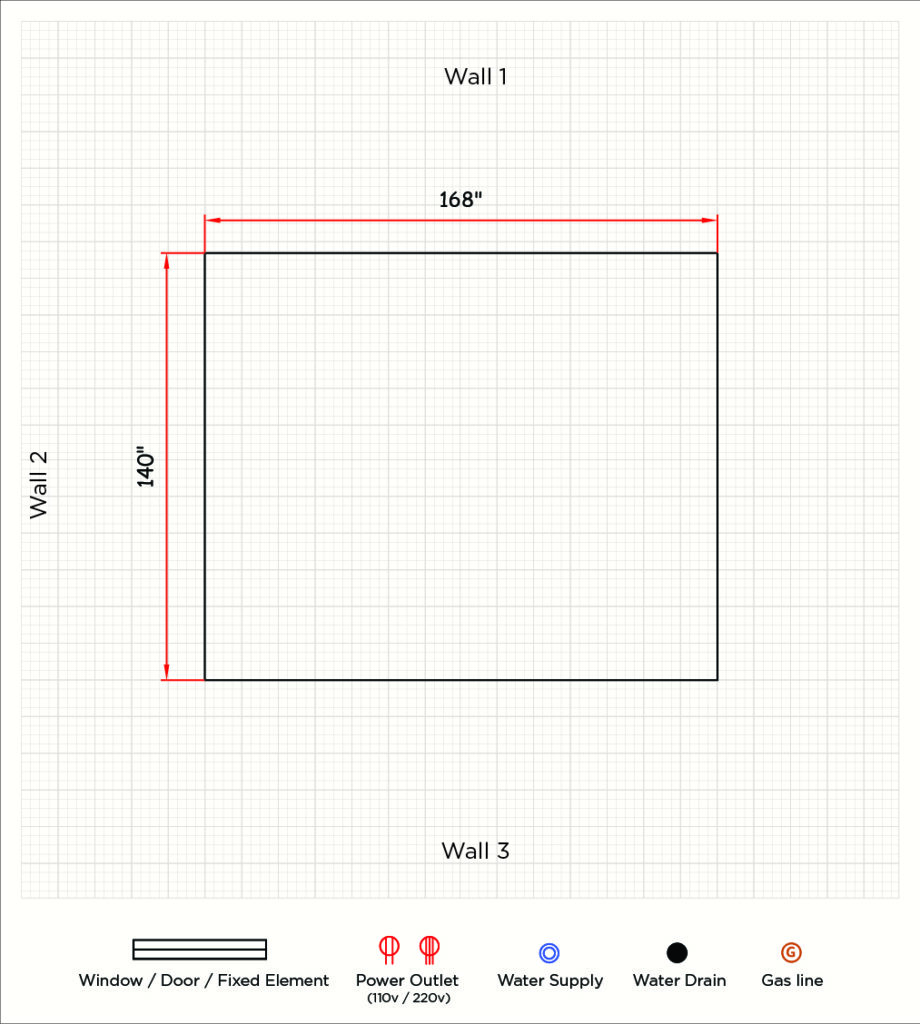
Always measure in inches (e.g., write down 140 inches, not 4 feet 7 inches). This is the standard language of the cabinet industry, ensuring your order will be accurate.
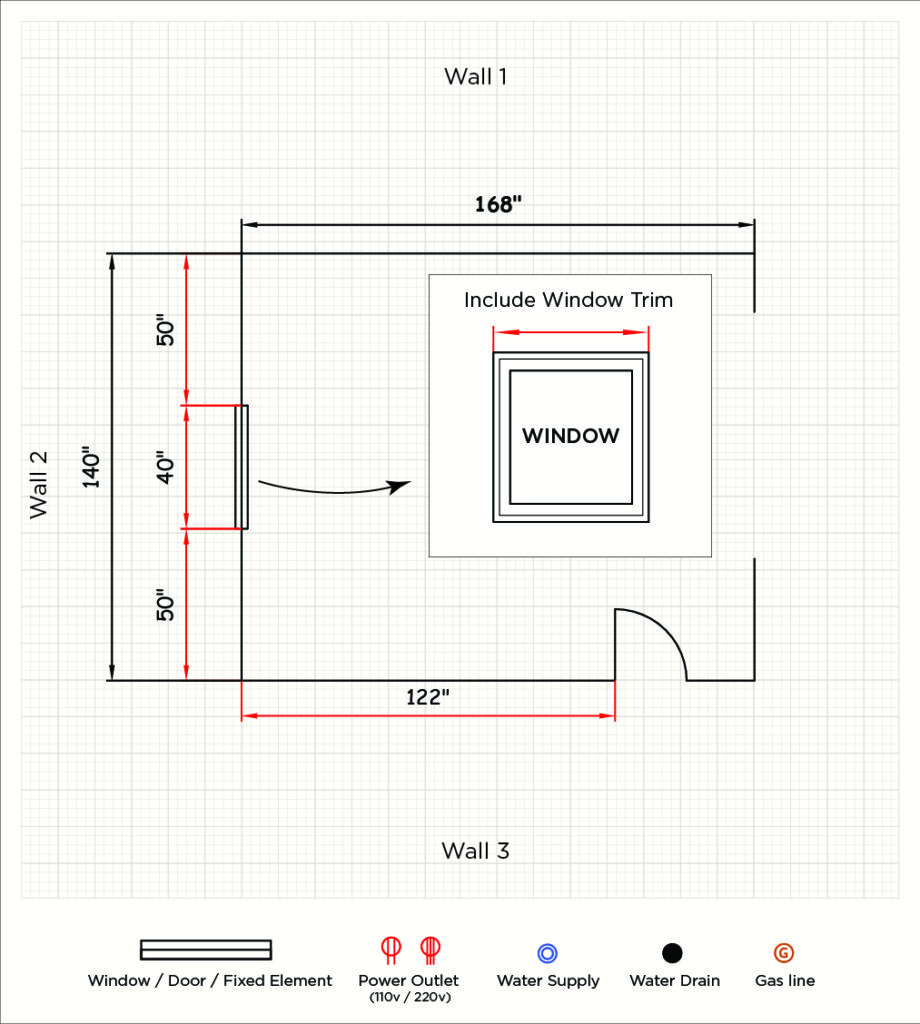
Step 3: Mark Obstructions
Now, locate the permanent fixtures in the room. Measure from the wall corner to the outside edge of the casing (trim) of the window or door. Mark this clearly on your layout.
Step 4: Place Appliances
Identify where your major appliances will go: the refrigerator, stove, and dishwasher.
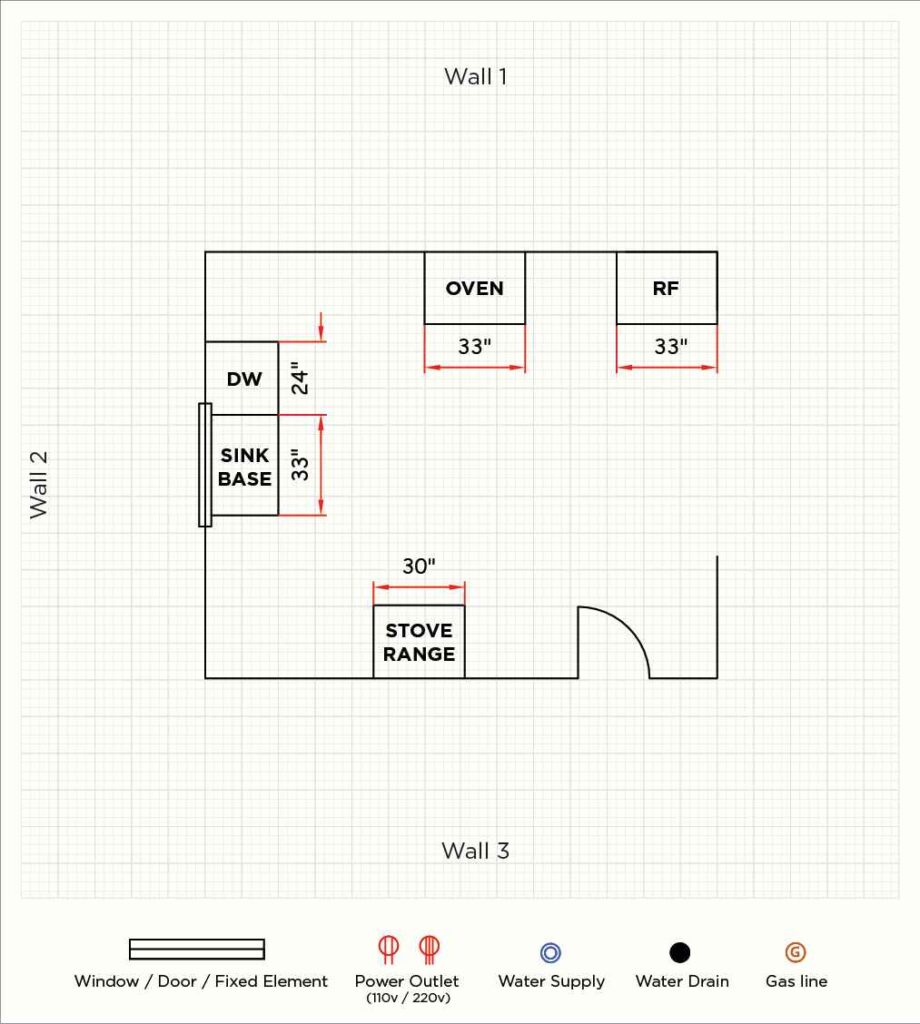
Cheat Sheet: Standard Appliance & Kitchen Cabinet Sizes
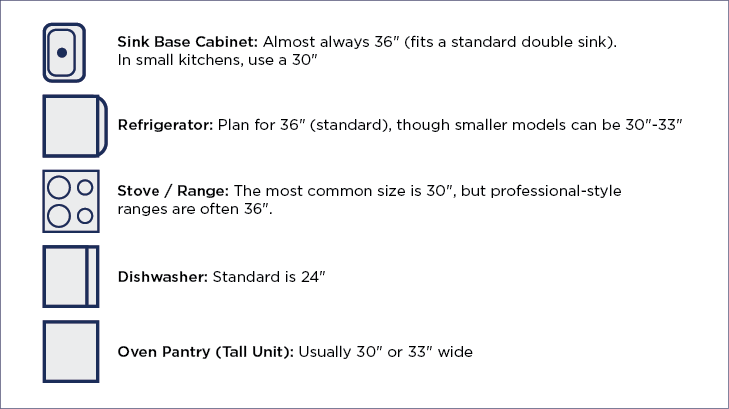
If you don't have your appliances picked out yet, use these industry standards to plan your layout safely:
- Dishwasher: Standard is 24".
- Stove / Range: The most common size is 30", but professional-style ranges are often 36".
- Refrigerator: Plan for 36" (standard), though smaller models can be 30"-33".
- Sink Base Cabinet: Almost always 36" (fits a standard double sink). In small kitchens, use a 30".
- Oven Pantry (Tall Unit): Usually 30" or 33" wide.
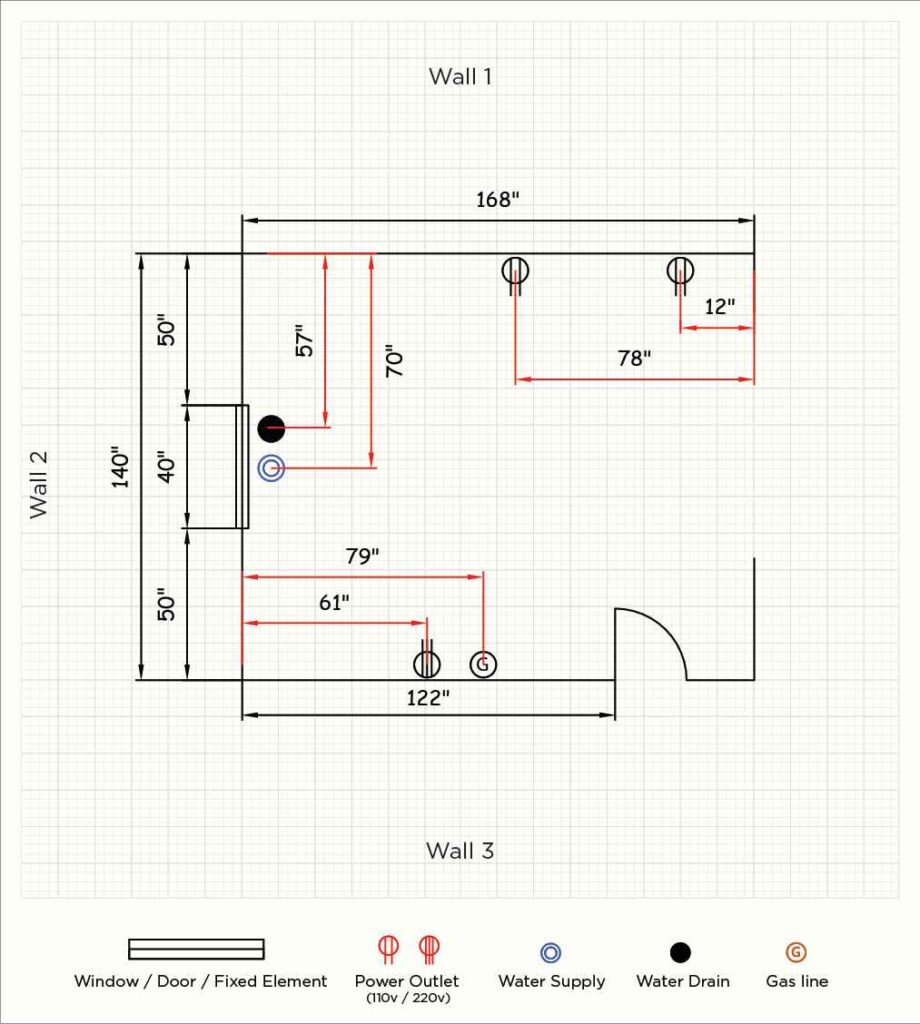
The "Center Point" Rule for Utilities:
Since you cannot easily move gas lines or sink plumbing, you must measure exactly where they are. Do not just measure to the edge of the stove. Measure from the nearest wall corner to the exact center of the gas pipe or sink drain. This process ensures that when you place your Sink Base or Stove Cabinet, it is perfectly centered over the connections.
The Fridge Box Pro Tip:
If you want your kitchen to look high-end, don't just leave a gap for the fridge. You should build your fridge in.
The Math: Plan for a 1.5" panel on each side (Total: Add 3" to your fridge width).
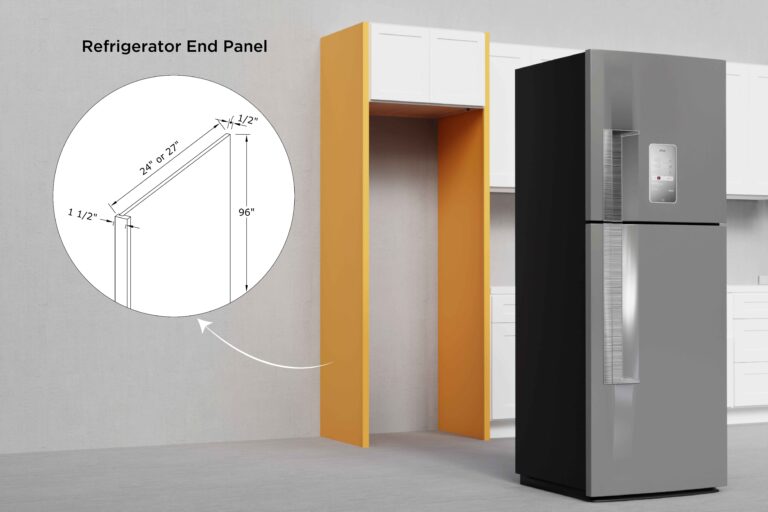
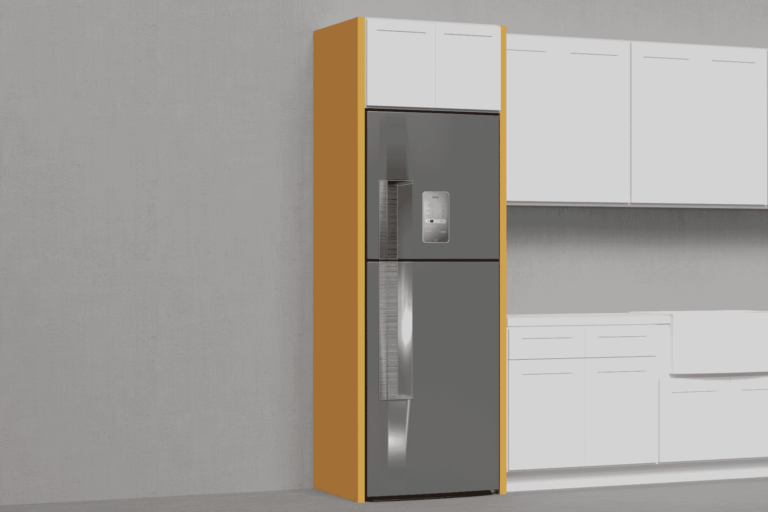
Good to Know: Some cabinet lines come with wider fillers (up to 3" per side). Don't worry if they seem too wide; these are designed to be cut down on-site so you can trim them for a perfectly tight fit.
The "Subtraction Method"
This is the secret that professional designers use to figure out what fits. You don't need to guess cabinet sizes; you do the math.
The Formula:
Total Wall Length - Fixed Items - Corner Cabinet = Playable Space
-
- Fixed Items: Items that cannot move, such as a tall pantry cabinet or a window.
-
- Corner Cabinet: You must account for the corner (see Step 6) before you can figure out the middle.
-
- Playable Space: The number left over is the space you have available for your base cabinets.
Step 5: Record Your Vertical Measurements
Knowing your ceiling height is non-negotiable because it dictates exactly which wall cabinets you need to buy. Measure from the floor to the ceiling at least three times in the kitchen (floors in older homes are rarely perfectly level). Take the smallest measurement of the three.
Kitchen Cabinets Height Cheat Sheet
Use this rule to determine your wall cabinet height immediately:
-
- 96" (8 ft) Ceilings: Buy 42" Tall Wall Cabinets.
These run all the way to the ceiling, giving you a modern look and eliminating the dust-collecting gap above your cabinets, and leaving a recommended 18" backsplash.
- 96" (8 ft) Ceilings: Buy 42" Tall Wall Cabinets.
Note: You can add crown molding, but keep it under 3" so you can have at least 15” of working space between base and wall cabinets.
-
- 90" (7.5 ft) Ceilings: Buy 36" Tall Wall Cabinets.
This leaves room for crown molding without overcrowding the ceiling.
- 90" (7.5 ft) Ceilings: Buy 36" Tall Wall Cabinets.
-
- 84" (7 ft) Ceilings: Buy 30" Tall Wall Cabinets.
This ensures you still have standard clearance above your countertop.
- 84" (7 ft) Ceilings: Buy 30" Tall Wall Cabinets.
Step 6: The "Filler" Rule
This is the most common mistake first-time remodelers make. If you design a row of cabinets that ends directly against a wall, you cannot use the whole space. You must subtract 2 to 3 inches for a Filler.
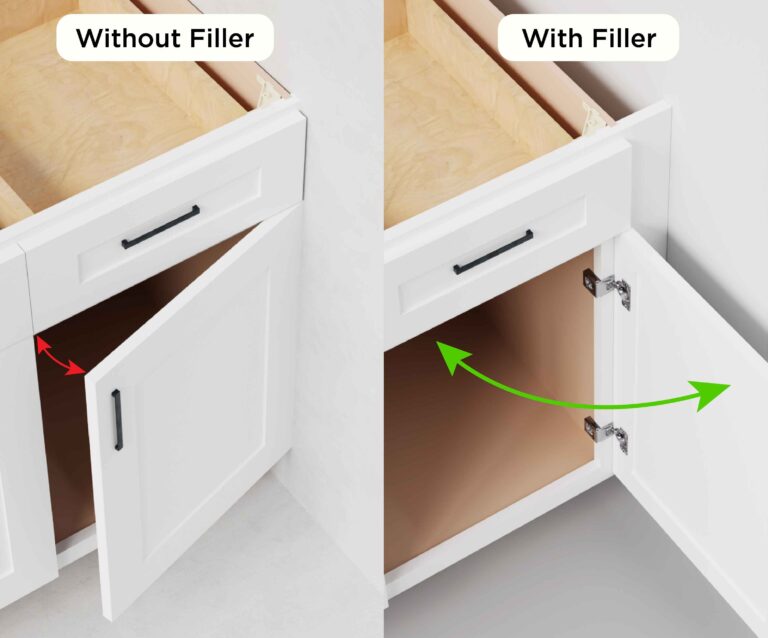
Pro Tip:
If a cabinet with a door is installed flush against a wall, the door handle will hit the wall, preventing the door from opening past 90 degrees. A filler strip pushes the cabinet away from the wall, allowing the door to swing freely and drawers to open without scraping paint.
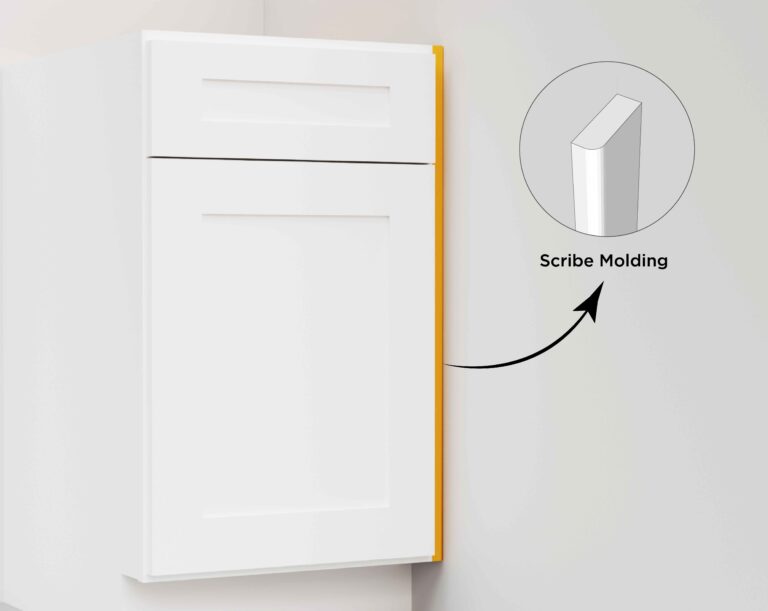
The Scribe Molding Solution
Sometimes, you don't have room for a filler.
-
- Example: Let's say you have exactly 61 inches of wall space.
-
- The Layout: You use two 30-inch cabinets (30 + 30 = 60).
-
- The Problem: You only have 1 inch left over, not enough for a standard filler.
-
- The Fix: Scribe Molding
This is a thin piece of trim that attaches to the cabinet's face frame and covers the small gap against the wall. It provides a finished look and leaves just enough clearance for the door to open.
- The Fix: Scribe Molding
Pro Tip:
You can use Scribe Molding (or Shoe Molding) to tie the Toe Kick to the floor. Instead of struggling to cut the toe kick board to match a wavy or uneven floor, simply install the toe kick straight and cover the bottom gap with a strip of this molding. It bends easily to follow the floor’s contours, instantly hiding gaps for a seamless finish.
Step 7: Master the Corners
You cannot design a kitchen without solving the corner first. The corner cabinet dictates the spacing for the rest of the run. You generally have four options:

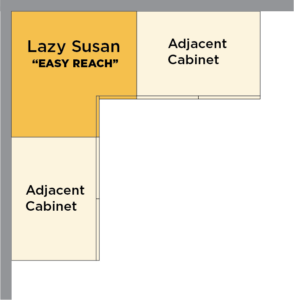
Option A: The Lazy Susan (The "Easy Reach")
This is the preferred choice for 90% of kitchens. It typically requires 36 inches of wall space on each wall (sometimes 33"). It maximizes storage efficiency and provides an accessible, rotating tray for pots and pans.
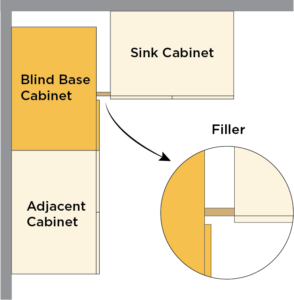
Option B: The Blind Base
This is the "Problem Solver" cabinet. Use a blind base cabinet only if your sink is too close to the corner (less than 36 inches) to fit a Lazy Susan. It slides into the corner, half-hidden. It requires a filler to ensure the door and drawer can open without hitting the adjacent cabinet handle.
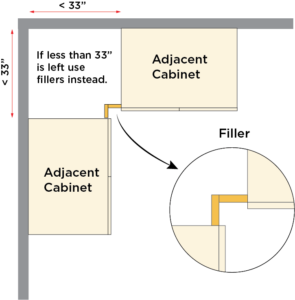
Option C: Killing the Corner
This is for tight layouts where neither a Lazy Susan nor a Blind Base will fit. You box off the corner using two fillers that meet at a 90-degree angle. While you lose the storage space in the corner, it ensures that the drawers and doors on either side can open fully without colliding.
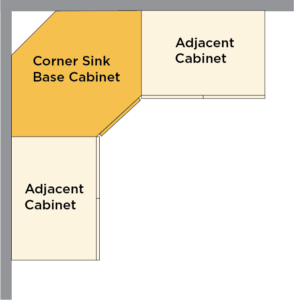
Option D: The Corner Sink Base (The Diagonal)
Unlike the sharp 90-degree turn of a Lazy Susan, this cabinet cuts across the corner at a 45-degree angle. It is designed specifically to house a sink, allowing you to stand comfortably in the corner while washing dishes. It is the best for kitchens with corner windows or specific plumbing layouts.
In RTA cabinetry, this is often sold as a "Corner Sink Face" (a front frame) that connects two adjacent cabinets. You typically need to install 2x4 cleats on the wall and run the flooring all the way back to support it.
Step 8: The Wall Cabinets Alignment Rules
Before you match your upper cabinets to your lowers, you need to solve a standard geometry puzzle: Wall corners are smaller than base corners.
The "12-Inch Gap" Problem
If you select a standard 36" Lazy Susan for your base, the matching upper cabinet is usually a Diagonal Corner Wall (DCW).
1. The Math: A DCW only takes up 24 inches of wall space.
2. The Result: Since the base takes 36" and the wall takes 24", you are left with a 12-inch difference on each side.
How to Fix It (Cost vs. Design):
The "Easy" Fix: You can place a 12" wide wall cabinet next to the corner to fill the gap. However, buying two extra-small cabinets adds to the cost of your project.
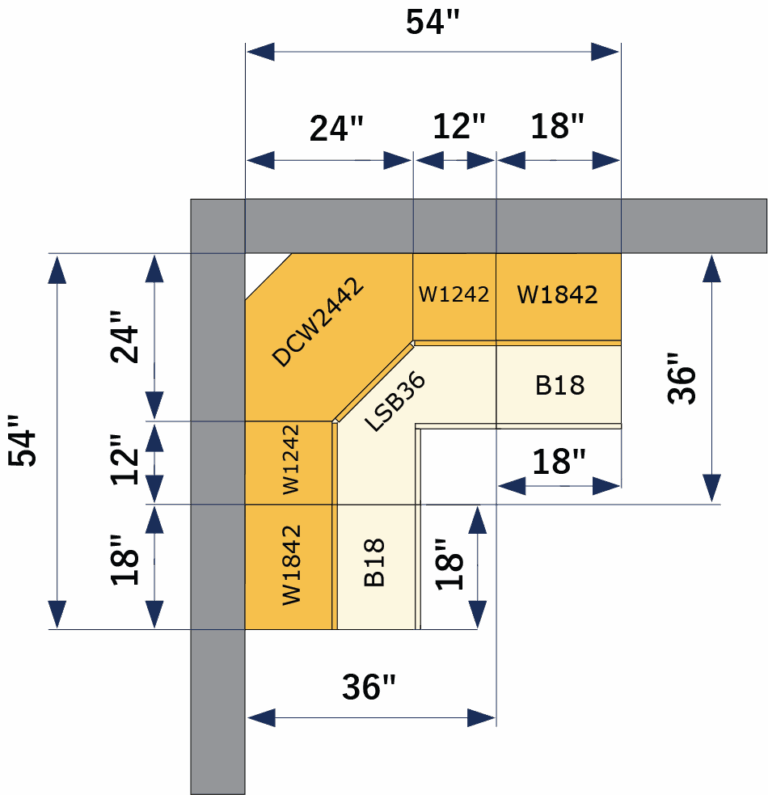
The "Pro" Fix: Instead of buying a separate 12" cabinet, take the cabinet that would have gone there and make it 12 inches wider.
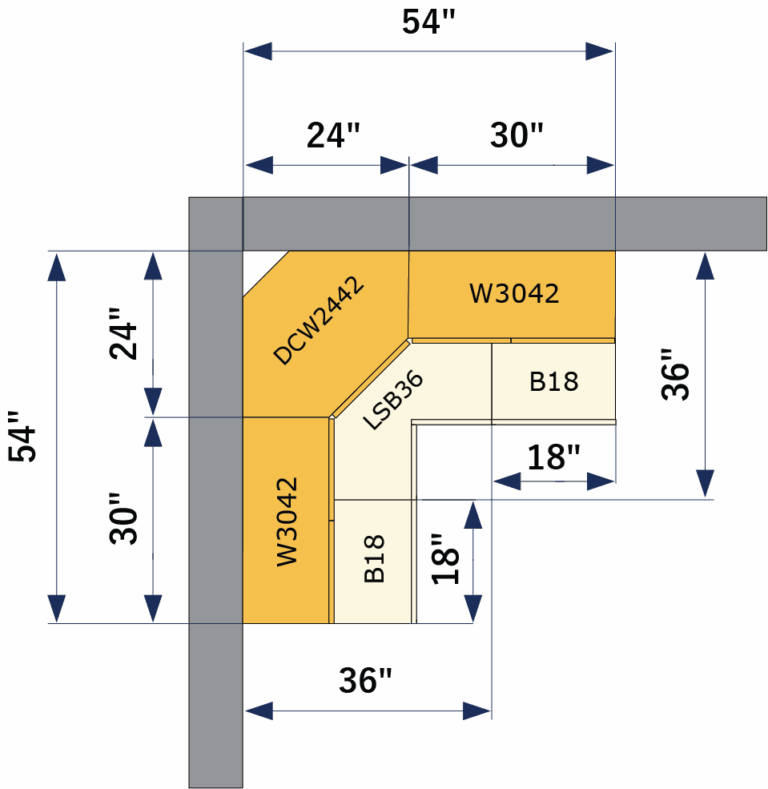
Example: If you planned for an 18" cabinet next to the corner, buy a 30" cabinet instead (18" + 12"). This looks cleaner and saves you money.
Choose Your Look: Diagonal vs. Right Angle Kitchen Cabinets
You also need to decide how you want the corner to look.
-
- The Diagonal Look (DCW): This is the standard angled cabinet. It cuts across the corner.
-
- The Right-Angle Look (90 Degrees): If you prefer your cabinets to follow the wall perfectly (a sharp 90-degree turn), you have two options:
1. Wall Blind Corner (WBC): Part of the cabinet is hidden in the corner. This creates a clean, square look.
2. Wall Easy Reach (WER): An L-shaped cabinet with bifold doors. It offers the square look but with full open access to the inside.
Tip: Search "WER" or “WBC” on our site to find these in selected cabinet lines.
Once you have used the "Subtraction Method" to calculate your base cabinets, designing the wall (upper) cabinets is simple.
-
- The Right-Angle Look (90 Degrees): If you prefer your cabinets to follow the wall perfectly (a sharp 90-degree turn), you have two options:
The Bridge Kitchen Cabinets
The cabinets above your sink (if there is no window) and above your microwave/stove need to be shorter to allow for head clearance.
Bridge Cabinets Cheat Sheet:
If you are using 30" Tall cabinets, use a 12-15" High bridge cabinet.
If you are using 36" Tall cabinets, use an 18" High bridge cabinet.
If you are using 42" Tall cabinets, use a 24" High bridge cabinet.
How to Measure Kitchen Island
We often get asked, "How do I order a kitchen island?"
The answer is more straightforward than you think: You build it like blocks. An island isn't a single product; it's a custom configuration of standard cabinets arranged to fit the center of your room. Whether you want a massive prep station or a slim breakfast bar, here is how to construct it:
Option A: The Massive Storage (4' x 8')
For a large, deep island, you install standard base cabinets back-to-back. This gives you fully accessible storage on both the front and back.
- The Finish: You will need skins or Scribe Molding to cover the vertical seam where the backs of the two cabinets connect.
Option B: The Hybrid (36" Depth)
If you want an overhang for seating but don't have room for a massive island, combine a 24" Base cabinet on the front with a 30" High Wall cabinet (which is 12" deep) on the back.
- Critical Step: Since wall cabinets are shorter than base cabinets, you must build a 4.5" platform - toe kick for the wall cabinets to sit on. This raises them to sit flush with the base cabinets.
Option C: The Standard Row (4' x 2')
For smaller islands, you can use a single row of base cabinets. However, remember that the backs of all cabinets are unfinished raw plywood. Unless you are building a "pony wall" to hide them, you must finish the back.
- Island Panels: You need to cut these 4x8 sheets to size to cover the raw plywood backing.
- Outside Corner Molding (OCM): Once the panel is on, you will see a raw seam where the panel meets the cabinet side. You must use OCM to cover this corner for a professional look.
Pro Tip:
Standard kitchen cabinets are built with raw, unfinished plywood backs because they are designed to go against a wall. When you build an island, those raw backs are exposed. Whether you build Option A, B, C, or D you must order a 4'x8' Island Panel (Skin) to cut and cover the back and sides. Without it, your island will look unfinished.
The Final Kitchen Measurement Check
Before you finalize your list, run this quick calculation to confirm the height of your kitchen backsplash.
Ceiling Height - Cabinet Height - Counter Height = Backsplash Clearance
The backsplash range is 15-20 inches; 18 inches is the most common height.
Summary Checklist
You have measured the walls, subtracted the fixed items, locked in your corners, and matched your heights. You are ready to order.
Before you check out, ensure you have added these commonly "forgotten" items:
- Toe Kicks: To cover the gaps between cabinets at the floor level.
The Method: Add up the total width (in inches) of all your base cabinets. Take that total number and divide it by 96 (since Toe Kicks come in 96-inch lengths). The result is the number of pieces you need.
Here is the formula to keep handy:
TOTAL BASE CABINET WIDTH (Inches) ÷ 96 = QTY NEEDED
The Example: If you have 270" of total cabinet width:
270÷ 96 = 2.8
Result: Buy 3 pieces, since you always round up.
Pro Tip:
Since Shoe Molding runs along the same path as your Toe Kick, buy the same quantity as calculated above.
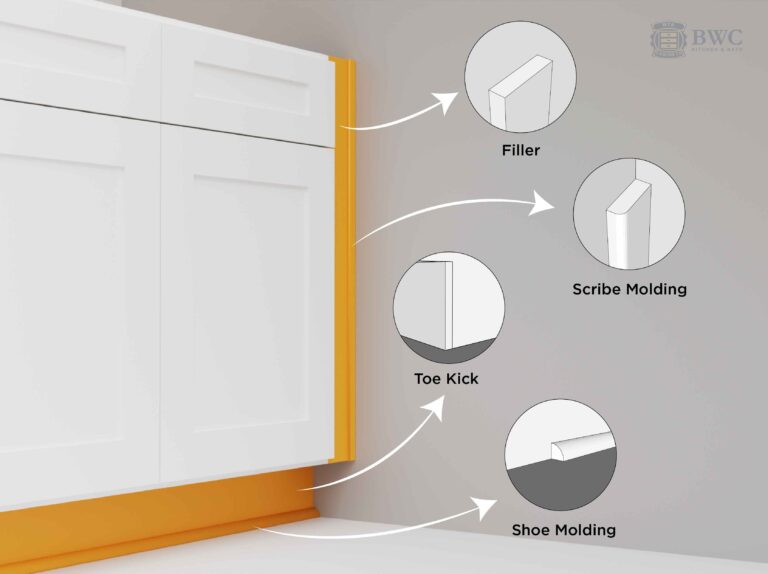
Achieving the Built-In Kitchen Look
Fillers: For any cabinet touching a wall.
Scribe Molding: To cover any small gaps between the cabinet and the wall/ceiling.
Shoe Molding: Installs at the very bottom of the toe kick to hide the seam where the cabinet meets the floor.
Measuring your own kitchen isn't rocket science; it's just simple math. By taking 30 minutes to do this yourself, you have avoided the "Free Design" markup and gained total control over your renovation
Disclaimer: This guide is provided for educational purposes only. Since every home has unique structural conditions, Buy Wholesale Cabinets assumes no liability for measurement errors or ordering mistakes. The customer is solely responsible for verifying all final dimensions and site conditions before purchase.
FAQ
What are standard cabinet measurements?
For a complete breakdown of available widths, heights, and depths, see our Guide to Standard Kitchen Cabinet Dimensions.
What is the best way to measure kitchen cabinets?
Measure the full wall-to-wall width, the floor-to-ceiling height in three different spots (take the lowest number), and mark the exact center points of your plumbing and gas lines.
When is it necessary to hire a proffesional for measuring?
Hire a pro if your kitchen has non-90-degree corners, vaulted ceilings, or severely uneven floors.
How do I handle measurements if I can't remove old cabinets yet?
Measure the room, not the cabinets. Measure wall-to-wall above the backsplash or near the floor (toe-kick area). Always assume the walls are slightly tighter than they appear.
How do I ensure new appliances will fit if I plan to upgrade later?
Design for standard sizes, not specific units. Leave a 36-inch opening for the fridge, a 30-inch opening for the stove, and 24” for the dishwasher. You can use temporary fillers now, but this ensures future standard models will fit.
How do I measure corner kitchen cabinets correctly?
Measure the available space on both walls, starting from the corner. Remember that a standard Lazy Susan requires 36 inches of clear space on each wall to fit.
Should I measure cabinets in inches or centimeters?
Always use inches. The entire US cabinet industry uses inches for sizing, so using centimeters can cause conversion errors.
How many inches should cabinets be from the countertop?
The standard clearance is 18 inches between the top of the counter and the bottom of the wall cabinets.